Adding Custom Properties to Objects in Classic ASP

I the last blog post Converting Recordset into Objects in Classic ASP we created a public function initialize(rs) which takes in a single row from the database and creates a single class object account.  Our goal is to add a new property named fullname where we combine firstname and lastname

We will update the public function initialize(rs) as follows:


public function initialize(rs)

dim row
set row = New account

   row.id = rs("id")
   row.guid = rs("guid")
   row.lastName = rs("lastName")
   row.firstName = rs("firstName")
   row.fullname = rs("firstName") & ", " & rs("firstName") 
   row.email = rs("email")
   row.password = rs("password")
   row.passwordSalt = rs("passwordSalt")
   row.clientId = rs("clientId")
   row.administrator = rs("administrator")
   row.lastLogin = rs("lastLogin")
   row.created = rs("created")
   row.modified = rs("modified")
   row.active = rs("active")

set initialize = row

end function

Updated the UL code with a new LI item for fullname.

<%
Dim rsAccount
set rsAccount = getall()
%>

<ul>

<%
  While (NOT rsAccount.EOF)

  Dim account
  call account = initialize(rsAccount)

 %>
 
   <li><%=account.id</li>
   <li><%=account.guid</li>
   <li><%=account.lastname</li>
   <li><%=account.firstname</li>
   <li><%=account.fullname</li>
   <li><%=account.email</li>
   <li><%=account.password</li>
   <li><%=account.passwordSalt</li>
   <li><%=account.clientId</li>
   <li><%=account.administrator</li>
   <li><%=account.lastLogin</li>
   <li><%=account.created</li>
   <li><%=account.modified</li>
   <li><%=account.active</li>
 
 <% 
  rsAccount.MoveNext()
  Wend
 %>

</ul>

If you run the code as is, you will get an error Variable is undefined: 'fullname'

All we need to do is make sure the account Class a property defined for fullname.

Class account

  public id
  public guid
  public lastName
  public firstName
  public fullname 
  public email
  public password
  public passwordSalt
  public clientId
  public administrator
  public lastLogin
  public created
  public modified
  public active

End Class

Now your code should run without an error. You now have an account object with a property fullname.

If you are a looking for Classic ASP Experts or upgrading to .NET from Classic ASP , give us a call.


Converting Recordset into Objects in Classic ASP

Now that you know how to create a Class and Objects in Classic ASP, we will look at Converting Recordset into Objects in Classic ASP.

Lets create a Class account which has several properties. I usually use the database table account and copy the model so the Class matches the database model

Class account

  public id
  public guid
  public lastName
  public firstName
  public email
  public password
  public passwordSalt
  public clientId
  public administrator
  public lastLogin
  public created
  public modified
  public active

End Class

Here I am creating a getall function to return all the rows in the account table in the database.

public function getall()

   dim sql
   sql = "select * from account"

   dim rs
   set rs = conn.execute(sql)
   set getall = rs

end function

When I started with Classic ASP, I would have written a simple While Loop

<%
Dim rsAccount
set rsAccount = getall()
%>

<ul>

<%
  While (NOT rsAccount.EOF)
 %>
 
   <li><%=rsAccount("id")%></li>
   <li><%=rsAccount("guid")%></li>
   <li><%=rsAccount("lastname")%></li>
   <li><%=rsAccount("firstname")%></li>
   <li><%=rsAccount("email")%></li>
   <li><%=rsAccount("password")%></li>
   <li><%=rsAccount("passwordSalt")%></li>
   <li><%=rsAccount("clientId")%></li>
   <li><%=rsAccount("administrator")%></li>
   <li><%=rsAccount("lastLogin")%></li>
   <li><%=rsAccount("created")%></li>
   <li><%=rsAccount("modified")%></li>
   <li><%=rsAccount("active")%></li>
 
 <% 
  rsAccount.MoveNext()
  Wend
 %>

</ul>

The above code would write to the screen a <UL> foreach account row and <LI> foreach field/record in the database.

Object-Oriented Programming Approach

An OOP [Object-Oriented Programming] approach would be to initialize each account record using the account Class.

Instead of getting each data element using Recordset rsAccount("lastName"), we will use another function to map the Recordset row into our account object.

The public function initialize(rs) takes in a single row from the database and creates a single class object account.


public function initialize(rs)

dim row
set row = New account

   row.id = rs("id")
   row.guid = rs("guid")
   row.lastname = rs("lastname")
   row.firstname = rs("firstname")
   row.email = rs("email")
   row.password = rs("password")
   row.passwordSalt = rs("passwordSalt")
   row.clientId = rs("clientId")
   row.administrator = rs("administrator")
   row.lastLogin = rs("lastLogin")
   row.created = rs("created")
   row.modified = rs("modified")
   row.active = rs("active")

set initialize = row

end function

Updated code combining Recordset with Class and Initializing each row into an object.

<%
Dim rsAccount
set rsAccount = getall()
%>

<ul>

<%
  While (NOT rsAccount.EOF)

  Dim account
  call account = initialize(rsAccount)

 %>
 
   <li><%=account.id</li>
   <li><%=account.guid</li>
   <li><%=account.lastname</li>
   <li><%=account.firstname</li>
   <li><%=account.email</li>
   <li><%=account.password</li>
   <li><%=account.passwordSalt</li>
   <li><%=account.clientId</li>
   <li><%=account.administrator</li>
   <li><%=account.lastLogin</li>
   <li><%=account.created</li>
   <li><%=account.modified</li>
   <li><%=account.active</li>
 
 <% 
  rsAccount.MoveNext()
  Wend
 %>

</ul>

If you are a looking for Classic ASP Experts or upgrading to .NET from Classic ASP , give us a call.
 

How to create a Class and Objects in Classic ASP

Creating Objects in programming is one the best ways to have code that is easily maintainable. With new Classic ASP clients, I have found creating Classes and Objects is a very good way to begin refactoring legacy code.

Class trip

    public arrive_date
    public depart_date

End Class

Here we have created a Class trip with 2 properties arrive_date and depart_date. Now, when we need to access the arrival date, you can access the values as

myobject.arrive_date
myobject.depart_date

Before we can access or use the trip Class, we need to create a new instance of a class. The newly instantiated trip Class, which is now an object with the properties, that we can use.


Class trip

    public arrive_date
    public depart_date

End Class


dim objTrip
set objTrip = new trip

objTrip.arrive_date = '02/11/2017'
objTrip.depart_date = '02/16/2017'

Now that we have created a new instance of our trip and assigned values to each property, we can write some simple HTML to retrieve the values

<p>

I will be arriving on <%=objTrip .arrive_date%> and leaving on <%=objTrip .depart_date%>

<p>


If you are a looking for Classic ASP Experts or upgrading to .NET from Classic ASP , give us a call.


Isotope Sorting Ascending / Descending

We worked on a project where we had a media library. We decided to use Isotope to filter/sort through a list of all the media items available. We wanted to the user to be able to sort through the items in both Ascending / Descending order. Below is how we accomplished that.

By default, Isotope sorts ascendingly: A, B, C and 1, 2, 3. To sort descendingly Z, Y, X, and 9, 8, 7, set
sortAscending: false.

// sort highest number first
$grid.isotope({
  sortBy: 'number',
  sortAscending: false
});

We first added a data-attribute called data-sort-direction="asc" on a button element. When the button is clicked we get the data-sort-direction="asc" data-attribute value and convert that value to a boolean. We then use that boolean to set our new direction and store that in a variable called newDirection to use later.

 /* convert it to a boolean */
    var isAscending = (direction == 'asc');
    var newDirection = (isAscending) ? 'desc' : 'asc';

We then pass in our isAscending value into the sortAscending property.

/* pass it to isotope */
    $grid.isotope({ sortBy: sortValue, sortAscending: isAscending });

The last bit of code we use is to change the value data-sort-direction="asc" to the value of newDirection. This is so that next time the button is clicked it will sort the items in the opposite order.

$(this).attr('data-sort-direction', newDirection);

Deleting Custom Fields in WordPress

While working on a project you may have had custom fields that are left behind and that are no longer in use for the current theme these unused custom fields remain in your database. I came across this exact scenario when I was upgrading a section of a website that was outdated and needed to be re-done. The previous programmer had use a plethora of custom fields and my goal was to reduce the amount of custom fields used.

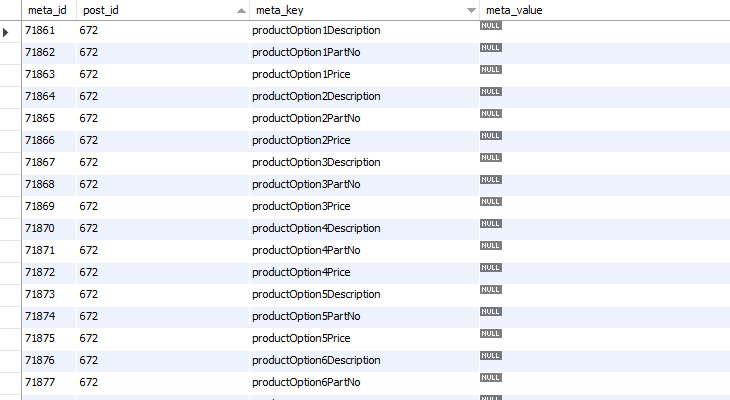
Take a look at the following example. All the custom fields that are not being used


Removing Unused Custom Fields

  1. Log into to phpMyAdmin
  2. Select your database.
  3. If you use a different database prefix than the default “wp_” one, then you’ll need to change that in the example below. Replace “meta_key” with your actual custom field name.
  4. Run the following script. ( The script will run and delete any references to that custom field and the data associated with it )
DELETE FROM wp_postmeta WHERE meta_key = 'meta_key';

Alternatively you can also run an sql script that looks at meta_key and see if there are any empty values

SELECT * FROM wp_postmeta WHERE meta_key = 'meta_key';

In my scenario I needed to look for any custom field containing the words productOption running the sql script returned the following.

SELECT * FROM wp_postmeta WHERE meta_key LIKE '%productOption%';

wp-unused-fields-db

Upgrade Wamp Server to PHP 7

We recently upgraded our development and production servers to PHP 7. We develop locally using Wamp Server so we needed to install PHP 7 on our computers as well. After digging around and some trial and errors I found the youtube video below.

Install Microsoft Packages

Download PHP 7

  • Download PHP zip file from http://windows.php.net/download/
  • Choose the correct file 64 or 84 bit Depending on your operating system
  • Choose the Thread Safe file

Create PHP7 Folder in wamp directory

  • Extract contents from PHP7 Download
  • Copy files over to a new folder in wamp\bin\php\php7.0
  • You will need to copy 2 files from an older php version php.ini and wampserver.conf into your new folder wamp\bin\php\php7.0

Modify php.ini

  • In your new folder open php.ini
  • In php.ini find extension_dir and replace the older php version with the new version
  • In php.ini find zend_extension and comment this line out it is no longer needed.
  • Create a copy of php.ini once the above changes are made and rename it to phpForApache.ini

Modify wampserver.conf

  • In your new folder open wampserver.conf and replace LoadModuleName and LoadModuleFile to load the PHP 7 like so

phpConf['apache']['2.4']['LoadModuleName'] = 'php7_module';
$phpConf['apache']['2.4']['LoadModuleFile'] = 'php7apache2_4.dll';
$phpConf['apache']['2.4']['AddModule'] = '';

Start Wamp Load PHP 7

  • Start Wamp > PHP > Version > 7

Notes: PHP 7 needs Apache 2.4 otherwise it will not run. Make Sure Wamp Server is running Apache 2.4. In the video the extensions were changed I tried it and it PHP 7 wouldn’t load in Wamp Server so i kept the same extensions from my previous php.ini file and it worked

Using Google Fonts for web.

Google fonts are a great free resource for web designers. Using them however, wasn’t straight forward for me at first. I’ve created a quick step by step guide for new web designers to use as reference.

Enjoy!


How to run a google font on a site.

First, go to https://www.google.com/fonts and select the fonts you wish to use by using the add to collection button.

In the bottom right corner, select use. This will take you to a page asking you to select the font weights you wish to use. Scroll down until you see the lines of code provided.


google-font-1


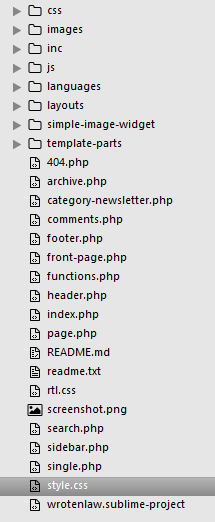
Next, open your theme folder from the repository using sublime. You will need to open the functions file and the style.css file.

In the functions file, scroll down to the Enqueue scripts and styles section.

Copy the “add this code to your website” line and paste it into the file with a new wp_enqueue line. It should look like line 163 below.


google-font-2


Next, open the style.css file and scroll to the typography section. Paste in the “integrate the fonts into your CSS” line as shown below on line 275.


google-font-3


Save your files and your font should be loaded.


If you want to use different fonts for headings and body content, make the following adjustments.


First, select the two fonts you want to use from https://www.google.com/fonts and select the fonts you wish to use by using the add to collection button, click use, and go to the almost done page.

When you copy the code, copy the line now containing two fonts.

google-font-4

Next, add the body font-family as previously instructed.

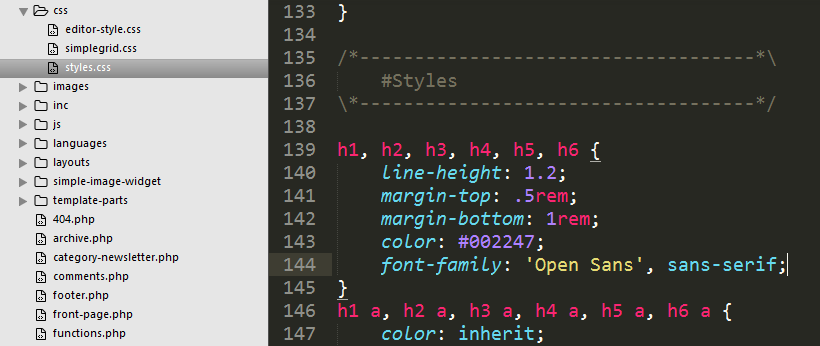
For the headings, open the css folder (not the css file used before.) From here, open the styles.css folder.

(For the body font, open the styles.css file highlighted in the picture below. For the header font, open the css folder at the top, then open the styles.css file contained.)
 
google-font-5


Once you open the other styles.css file, scroll down to the styles section. Paste in the font-family as shown below.


google-font-6

Save and your fonts should now be loaded.

JQuery Multi Email Validator

Used JQuery to create a custom email validator.

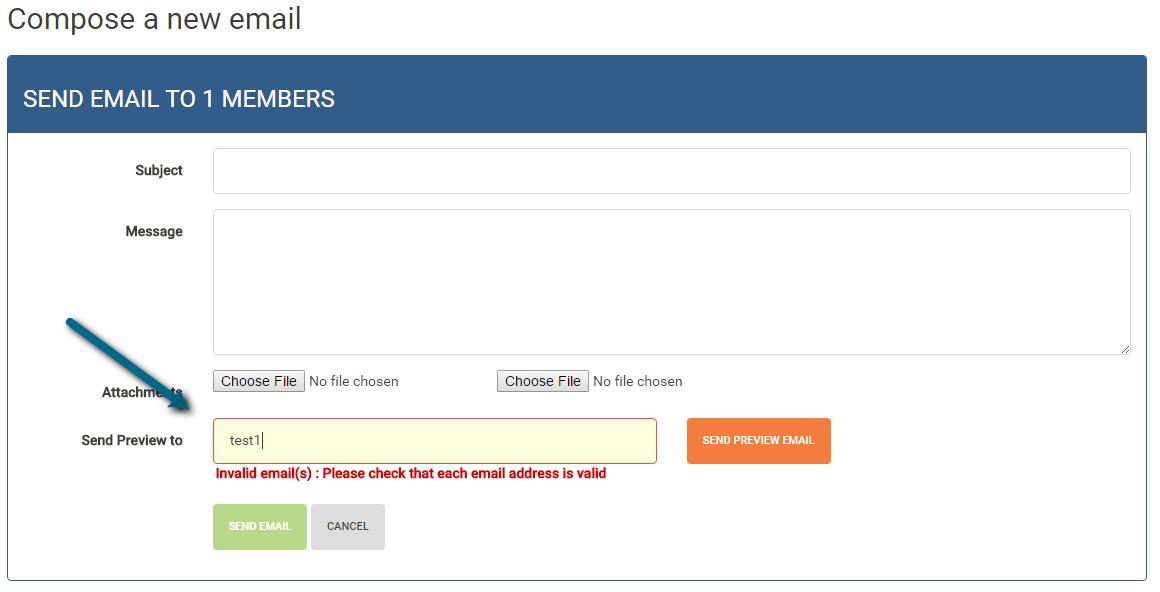
Problem: A single text-box which allows users to type in multiple email addresses.
Example: test1@somedomain.com, testA@somedomain.org

https://github.com/RaviRamDhali/programming-procedure/blob/master/Snippets/JavaScript/JQuery/emails-array-validator


jquery-multi-email-validator


API Employment Tax Careers examples

API Employment Tax Careers examples / instructions

Get all jobs

https://api.employmenttax.com/jobs/{APIKey}

https://api.employmenttax.com/jobs/e49f639223e8407583f95d1dd8867de0

Return:
 {
 "GUID": "64406b3e-3e5c-4da1-a543-856fe6d4a72d",
 "Title": "Dietary Supervisor",
 "FacilityTitle": "Liberty Terrace H & R",
 "PostDate": "2014-04-10T10:03:33.247",
 "ExpiredDate": "2014-05-10T10:03:33.247",
 "FacilityState": "MO",
 "FacilityCode": "S290C",
 "FacilityCodeID": 57009
 }, (more............)
 -----------------------------------------------------------------------

Get jobs by facility (filter by facility)

https://api.employmenttax.com/jobs/{APIKey}/{FacilityCodeID}

https://api.employmenttax.com/jobs/e49f639223e8407583f95d1dd8867de0/57009

RETURN:
 {
 "GUID": "979cb022-a109-4e28-aa95-fb6580892739",
 "Title": "Dietary Cook",
 "FacilityTitle": "Liberty Terrace H & R",
 "PostDate": "2014-04-10T10:03:21.513",
 "ExpiredDate": "2014-05-10T10:03:21.513",
 "FacilityState": "MO",
 "FacilityCode": "S290C",
 "FacilityCodeID": 57009
 }, (more..........)
 -----------------------------------------------------------------------

Get single job detail by Job Guid

https://api.employmenttax.com/jobs/{APIKey}/{FacilityCodeID}/{GUID}
https://api.employmenttax.com/jobs/e49f639223e8407583f95d1dd8867de0/57009/979cb022-a109-4e28-aa95-fb6580892739

RETURN:
 {
 "PostDate": "2014-04-10T10:03:21.513",
 "ExpiredDate": "2014-05-10T10:03:21.513",
 "GUID": "979cb022-a109-4e28-aa95-fb6580892739",
 "PositionNumber": "A27",
 "ContactName": "Leslie Young",
 "ContactEmail": "LYoung@skilledhc.com",
 "Description": "Under the direct supervision of the Dietary Supervisor, the Dietary Cook performs a variety of food preparation functions, including timely and accurate preparation of menus as outlined. Follows patient menus accurately and delivers nourishments to nurse units as required.",
 "Qualification": "Previous cooking experience in a healthcare or institutional environment required.  Experience in long-term care setting preferred. Must be able to work quickly to meet department schedules and must be able to meet 30-40 pound lifting requirements of the position.\r\n",
 "FacilityTitle": "Liberty Terrace H & R",
 "FacilityState": "MO",
 "FacilityCode": "S290C",
 "FacilityCodeID": 57009,
 "FLSATitle": null,
 "TravelTitle": "None",
 "TypeTitle": "Full TIme",
 "RelocationYesNo": "No",
 "Title": "Dietary Cook",
 "SalaryDescription": "Based on Experience",
 "Shifts": [
 {
 "ID": 0,
 "Title": "Day"
 },
 {
 "ID": 0,
 "Title": "Evening"
 },
 {
 "ID": 0,
 "Title": "Nights"
 },
 {
 "ID": 0,
 "Title": "Weekends"
 }
 ]
 }